Country / Region


Currency


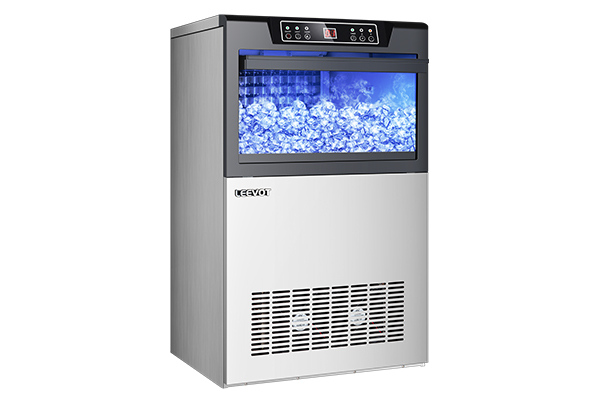
Freestanding ice machine is a common type of ice machine in the market, often used for commercial purposes, and can be found in supermarkets, milk tea stores, cafes, bars, restaurants and other places.
Taking LEEVOT split freestanding ice machine as an example, we can know how to use this type of ice machine.
Table of Contents
A few things you must do before using it
User's Guide
1. The parts of the ice machine and their functions4.Water pipe connection
5.Operation steps
6.Ice machine precautions
7.Basic troubleshooting
Conclusion
A few things you must do before using it
If you buy a freestanding ice machine, there are a few things you must do before you use it:
User's Guide
1. The parts of the ice machine and their functions
The ice maker is mainly divided into two parts: the main machine and the main body of the storage refrigerator, and some other accessories. The main unit accessories include a 4-point to 3-point quick connect, an L-shaped 3-point quick connect to 3-point insert, and a 9.52mm diameter white inlet pipe. Storage refrigerator accessories include a drain assembly, ice scoop, 4 adjustable feet, and 1 roll of raw tape.
Top vent - Air comes out of the top to ensure hot air is sent outward during ice making.
Operation Frame - The machine is operated by pressing a button to make ice.
External water supply pipe connection - The water inlet of the machine provides the water source.
Power cord - Provides power to the machine.
Ice pickup door - Protects the ice from outside air contamination.
Ice storage liner - The ice is automatically de-iced and dropped into the ice storage bucket after the ice making is completed, which plays the role of temporary preservation of ice.
Drain - Screwed into the white drain assembly included in the package, used to drain the ice when the ice maker is melting.
Adjustable foot - Adjusts the height of the machine.
2. How to install a freestanding ice machine
When the new machine arrives, the first thing you have to do is to unpack it and remove the carton, packing foam, bags and solid tape. Next is to check whether the manual and accompanying accessories are complete, if missing should be contacted with the company's after-sales service personnel as soon as possible.
When installing the machine, first of all, the four adjustable machine feet in the accessories screwed into the main body of the storage refrigerator, pay attention to adjustable machine feet to tight, do not have loose. Place the storage refrigerator on the horizontal ground, and then place the main machine on the storage refrigerator, after placing, to check the machine can not have shaking. The place where the machine is placed must be in a well-ventilated, relatively low ambient temperature, and requires the distance between the air outlet and the obstruction to be more than 8 feet, and the distance between the two sides of the face and the obstruction to be not less than 2 feet.
After the machine is installed, you need to connect the inlet pipe to the water tap (other models of ice machines can also use buckets of water) and connect a filter in the water line so that the water that passes through is clean and free of impurities, so that the ice produced is also more transparent and odorless. Then connect the drain pipe to the machine. At this point, the machine is installed and ready to start making ice.
If the machine has been inverted during transportation, it is recommended that the machine be left to stand for 4 hours before turning it on.
3. Cleaning of the ice machine
Cleaning your ice machine is important for your health and food safety. Commercial ice machines are very widely used and are used all over the world. If you are considering opening a restaurant or beverage store, for example, and have already purchased a commercial ice machine, you should want to know how to clean the ice machine. It is important that you clean not only the inside of the ice machine, but also the area around it. Here are a few steps on how to clean an ice machine.
New machines must be thoroughly cleaned before use to ensure that the ice produced is clean and clear.
1) Open the door of the machine to take ice.
2) Cleaning can be done with neutral detergent, warm water and a soft cloth. It is not necessary to buy ice machine detergent specifically, you can use a mixture of vinegar and water solution.
3) Repeatedly clean the inner liner of the storage refrigerator until the surface of the liner is clean.
4) Install the hose and turn on the power, press the cleaning button and let the machine clean once automatically.
5)Let the ice machine operate the ice making action once, then discard the ice cubes for the first time.
6) Cleaned with water or wipe the part tried with a wet cloth then dry with a dry rag.
1) Remove ice from the ice maker: Start cleaning the machine at the end of a shift or night, when you won't have much ice left, and store the removed ice in the refrigerator or cooler for continued use the next day.
2) Set the ice maker to cleaning mode: Most ice makers will have an automatic cleaning mode on the operator panel. After turning on the cleaning mode, you need to add detergent or a vinegar and water mixture to the ice maker and then let it run normally. The vinegar and water mixture will be flushed through the pipes to clean the path of water.
3) Remove ice from the cleaning process: Ice from the cleaning process must be removed and any residual detergent solution left in the machine must be removed. This is because cleaning residue can have health effects and you don't want your customers to get ice with a vinegar taste or other odor that could ruin a well-blended drink.
4) Clean the inside of your ice machine: You should clean the inside of your ice machine regularly. If the inside is wet for a long time it can breed bacteria, mold, etc.. So make sure the inside or edges are scrubbed clean to eliminate any potential problems.
5) Clean the outside and around the machine: After you have finished cleaning the inside of the machine, you should also rinse the outside of the machine and dry the water so that it looks shiny.
4. Water pipe connection
4) Water pipe and faucet connection: will be attached to the 4 points to 3 points pipe conversion head and valve connection (thread), move out of the conversion head snap insert white water pipe, and then the snap reset that is completed between the water pipe and faucet connection (faucet for the user to provide their own). The external electric water source requires 0.04~0.5MPa, if the water pressure exceeds 0.8MPa, it is necessary to increase the pressure reducing valve with the use (only for external faucet use).
5. Operation steps
Before making ice, we need to understand the name of each button of the operation panel and its specific function, and then adjust the ice making according to the size and type of ice necessary to run your business.
Power button - Press to turn on/off the machine.
Cleaning/deicing button - when not working, press to start cleaning ice tray, when working, press to start forced deicing, and automatically go to next round after deicing is finished.
LED display area:
Appointment/lighting key:
Turn on the water source, put the power button switch in ON position, the machine starts to operate, automatically detects if the machine needs to be cleaned or there are ice cubes still off, while this work is going on, you can press the appointment/lighting button to adjust the ice thickness by adjusting the ice making time. Adjust the time up or down according to the ice thickness you want. Press the “up” button once for 14+1 minutes, press the “down” button once for 14-1 minutes, and if you don't press the up or down button, the ice making time will be 14 minutes.
After the setting is completed, the ice making process officially starts. The machine will enter the cycle of ice making - ice stripping - ice making, and as long as the storage refrigerator is not full, it will keep producing ice to meet your continuous ice needs.
There are other models of our brand ice machine, the difference is the ice production and storage capacity of the machine, but its operation panel and ice making operation is similar to the model introduced in this article, so how to operate the ice making process can refer to the model.
6. Ice machine precautions
Conclusion
No matter which model of ice machine you buy, if you are a ice machine beginner, you can learn how to use the ice machine through this article. And if you have purchased a LEEVOT brand ice machine, then you should read this article even more, it can help you.
Related articles
How to Choose an Ice Machine: Nine Factors to Consider